- Changing fonts and tag styling in the theme in order to match company standards.
- Adding Google Tag Manager tracking code to the theme.

Step 1 – Create a Folder for Your Child Theme
To get started, navigate to the /wp-content/themes folder in your WordPress installation. Find your theme. Say it is named mytheme. Then, create a new folder named mytheme-childtheme.
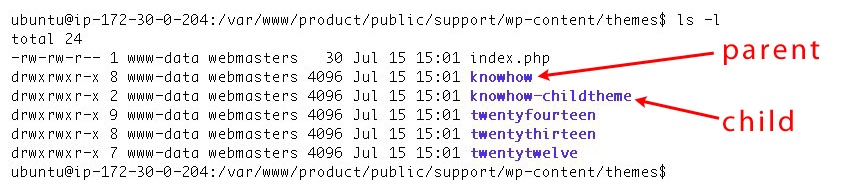
The Megalytic support website uses a 3rd party theme called KnowHow. So, after creating a directory for its child theme, our /wp-content/themes folder looks like this:
Step 2 – Create Your Child Theme's style.css File
Next, you need to create a style.css file inside your child theme folder. This is the first of two required files. The child style.css file can be used to hold any CSS that you would like to include to modify or add to the parent theme. It must begin with an official stylesheet header.
/*

 Theme Name:   KnowHow Child Theme

 Theme URI:    http://herothemes.com

 Description:  Child theme for KnowHow

 Author:       Chris Mooney (Swish Themes)

 Author URI:   http://herothemes.com

 Template:     knowhow

 Version:      1.0.0

*/
WordPress uses this header information to place your child theme in the Appearance Themes Screen, where you will be able to activate it once it is complete.
The most important field in this header is "Template". It must be set to the directory of the parent theme. In our case, this is knowhow.
Some 3rd party themes will come with a skeleton of a child shell child theme already included. That was the case with our KnowHow theme. If this is the case with your theme, you many need to modify the child style.css that has been included to bring it up to date with current WordPress best practice. Specifically, if you see an @import_url for the parent theme, you need to remove it.
Below are the headers for the KnowHow parent theme and the child theme skeleton that was provided.

Step 3 – Create Your Child Theme's functions.php File
In addition to the style.css file, you need to create a functions.php file. The purpose of this file is to load the parent theme's style.css file before loading the modifications and additions in the child theme's style.css file.
Your functions.php file should define a function that loads the parent's style.css file and then the child's style.css file. Technically, loading the child's file is optional, because it should happen automatically. But, it doesn't always work, so it is a good idea to include the extra code.
Use the wp_enqueue_style function to add the stylesheets. The code shown below works if the parent theme has only one main style.css to hold all of the css. If your parent theme has more than one .css file (eg. ie.css, style.css, main.css) then you need to enqueue each of them explicitly.
The first wp_enqueue_style function call here loads the parent style since get_template_directory_uri returns the parent theme directory when used in a child theme. Likewise, the second wp_enqueue_style function call loads the child style since get_stylesheet_directory_uri returns the child theme directory when used in a child theme. In this second function call, the third parameter is an array of dependencies. It includes only the parent, which ensures that the parent style will load before the child style.
[php gutter="0"]
<?php
function theme_enqueue_styles() {
$parent_style = 'parent-style';
wp_enqueue_style( $parent_style, get_template_directory_uri() . '/style.css' );
wp_enqueue_style( 'child-style',
get_stylesheet_directory_uri() . '/style.css',
array( $parent_style )
);
}
add_action( 'wp_enqueue_scripts', 'theme_enqueue_styles' );
/* Insert custom functions here */
?>
[/php]
Step 4 – Include Modifications in your Child Theme
Steps 1 - 3 have set up your child theme. But, right now there is nothing in the child theme, so it will look and act exactly like the parent. You can now make changes in a variety of ways. One way is to modify or add styles to the child theme's style.css file.
Customizing the Fonts and Tag Styles
Suppose for example, that you wanted to use different fonts in the body and the h1, ..., h6 tags. In that case you could add code like the following to the child theme's style.css file.
[css gutter="0"]
/* ------- Insert custom styles below this line ------- */
@font-face {
font-family: 'Pontano Sans';
src: url('/lib/font/Pontano_Sans/PontanoSans-Regular.ttf') format('truetype');
font-weight: normal;
font-style: normal;
}
@font-face {
font-family: 'Montserrat';
src: url('/lib/font/Montserrat/Montserrat-Regular.ttf') format('truetype');
font-weight: normal;
font-style: normal;
}
@font-face {
font-family: 'Montserrat';
src: url('/lib/font/Montserrat/Montserrat-Bold.ttf') format('truetype');
font-weight: 700;
font-style: normal;
}
body {
font-family: 'Pontano Sans', sans-serif;
}
h1, h2, h3, h4, h5, h6 {
clear: both;
font-weight: 700;
margin: 36px 0 12px;
font-family: 'Montserrat', sans-serif;
}
[/css]
Suppose that, in addition to changing some styles, you want to incorporate tagging into your site.
Adding Google Tag Manager to Every Page
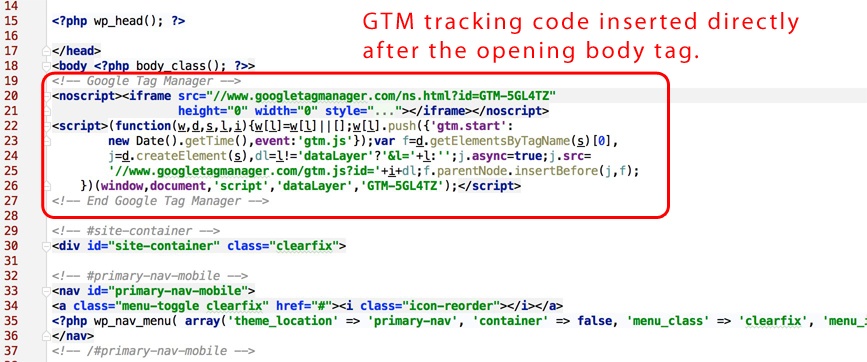
One way to do that is to copy the parent's header.php into the child theme directory. You can then edit this file, and the changes will override the parent's file. In fact, your child theme can override any file in the parent theme: simply include a file of the same name in the child theme directory, and it will override the equivalent file in the parent theme directory when your site loads.
So, for example, to add Google Tag Manager (GTM) to your website via your child theme, simply copy and paste the GTM snippet in to your child's header.php file, as shown below.
Step 5 – Turning On Your Child Theme
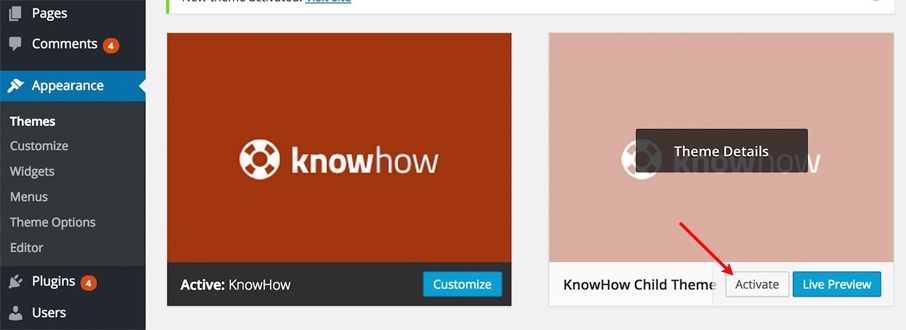
When you are ready to test our your child theme, you can simply navagate to the Appearance > Themes menu choice from the left hand side of your WordPress administration area. There, you will see your new child theme listed among the other theme choices. Roll your mouse over the child theme and click on the "Activate" button. That's all there is to it. Your child theme is now active. Go and test our your site to see if the changes you made to the child theme are working correctly.
Conclusion
Child themes can be a big help when you need to make changes to a 3rd party theme. They make it possible to separate your customizations from the original theme that you purchased. This is particularly useful when your original theme is upgraded, because in that case you can simply install the upgraded parent theme, and apply your modifications using your child theme. Note that if your child theme is overriding a parent theme file - like the header.php given here - you will still need to merge the new header.php file into your child theme's header.php file, and manually incorporate the upgraded changes. So, child themes are not a complete panacea for editing 3rd party themes, but they make like a lot easier by clearly isolating the changes you have made.

